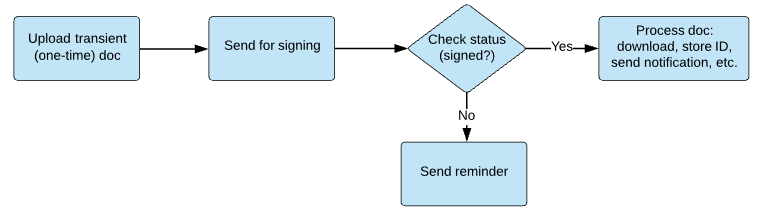
Hello World App
Once you’ve created a developer account, you’re ready to create your first app.
Create an app
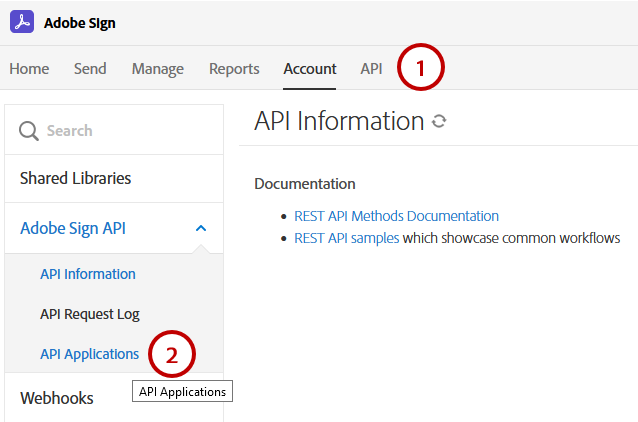
To use Acrobat Sign APIs, create an application.
Select API from the top menu. If you are already an enterprise customer, you may not see the API link. In that case, choose Account.
Select API Applications.
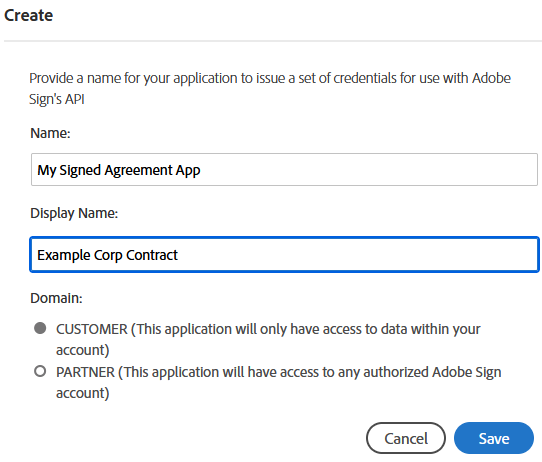
Select the Create (+) icon and provide details about your app.
Choose a domain based on the intended use:
CUSTOMER: Apps for internal use and testing.
PARTNER: Select this type if you’re developing an application for other users and your app needs access to other authorized Acrobat Sign accounts.
Note
PARTNER applications will not have full access to other accounts until they have been certified. Click here to get your application certified.
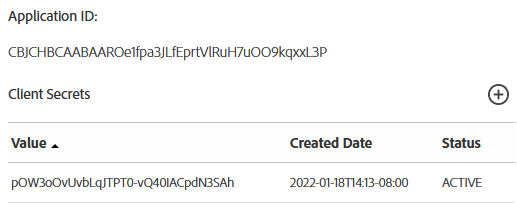
Get the app ID and secret
Select API Applications to view your app list.
Select your app to view its action menu.
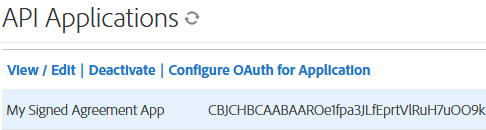
Select View/Edit to get the application ID and secret.
Save the app’s application ID and secret. You’ll use this information to issue access tokens in the Acrobat Sign API.
Note
Your new partner application is uncertified until you complete the partner certification process. You will be able to test the process of getting Acrobat Sign accounts connected to it by changing certain settings in the test/customer account (described below).
Configure OAuth
OAuth is widely used by developers to authorize API access. Acrobat Sign’s implementation complies with the OAuth 2.0 specification. Acrobat Sign uses the OAuth authentication protocol to authorize requests for any Sign API endpoint. Get the Application ID and Application Secret from the web UI of Acrobat Sign.
At a high level, the OAuth process requires the client application to request permissions from the end user before performing any actions on their behalf. Users redirect to the Acrobat Sign application where they authenticate and grant the requested permissions. The app then redirects users back to the client web application.
The OAuth process returns Access Tokens which can be used to make REST API calls. Once you have created your application, click on the “Configure OAuth” link to configure your OAuth integration. This page contains the following information:
Your “Client Id” and “Client Secret” needed during the token exchange.
The “Redirect URI” specifying where to redirect users (your website) after the OAuth flow.
The application’s scopes.
Configure the redirect URI
Next, create a public redirect URI on your infrastructure (your servers) that can capture the account details and code sent from your app’s authorization request so that the workflow connects to the customer’s Acrobat Sign account. This request URL you use to link your customer’s instance of your application to the Acrobat Sign account contains the parameters for the permissions and level (self,group, or account) that your API integration needs to enable the required actions.
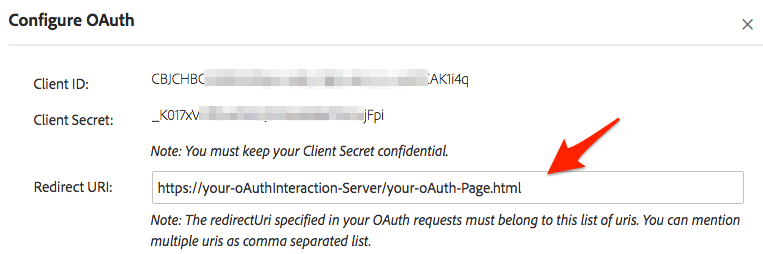
The redirect Uri specified in your OAuth requests must belong to this list of uris. You can mention multiple uris as comma separated list.
Select Configure OAuth for Application.
Enter your URL.
Before continuing, set the scopes as described below.
Tip
If you’re building a partner app and would like to learn more about using redirects, see What’s needed on the “redirect URI” page?
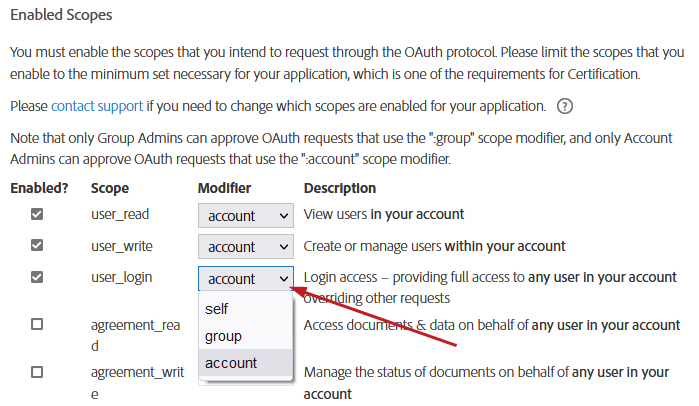
Configure scopes
You now need to add the permissions and “scopes” needed by your app when it interacts with the Sign APIs. Scopes describe what resources and actions your application will access. As a developer, you will need to enable at least the minimum appropriate scopes for your application on the admin page. If you apply for Certification, Adobe will review the enabled scopes to confirm that they match the intended application use.
Your application’s OAuth authorization requests include a scope parameter which indicates what requested permissions. Note the following:
The requested scopes must be a subset of the scopes that are enabled for the application.
The requested scopes must be appropriate for the action the user is attempting to perform.
The user will be asked to authorize the requested permissions for your application.
Assuming the OAuth tokens were successfully received, your application will make further API calls using the Access Token. The calls that your application makes must be permitted by the scopes associated with the Access Token. For example, to call GET /agreements, the agreement_read scope must have been requested and authorized.
While this screen sets the max allowable scopes, every token does not exercise them all. You can create different tokens for various users in specific scenarios may use one or more of the scopes. Limit the scopes to those that you intend to request through OAuth. The scope denotes the extent of permission that your users will have on your account. For example, agreement_send:account user_login:self would allow the application to send on behalf of any user in the account and also login on behalf of the user that authorized the request.
Tip
Note that only Group Admins can approve OAuth requests that use the “:group” scope modifier, and only Account Admins can approve OAuth requests that use the “:account” scope modifier. While you probably don’t need all the possible permissions available on this configuration, it may be easier to enable everything during development and testing since it is relatively easy to come back later and adjust.
To set the scopes:
Check the Enabled checkbox for each needed scope.
Set the modifier.
Choose Save.
The following modifiers are available:
Modifier |
Description |
self |
Perform the specified action on behalf of the authorizing user. This is the default: for example, |
group |
Perform the specified action on behalf of any user in the same group as the authorizing user. The authorizing user must be a group admin in order to grant this scope, and must have the Business or Enterprise edition of Acrobat Sign. |
account |
Perform the specified action on behalf of any user in the same account as the authorizing user. The authorizing user must be an account admin in order to grant this scope, and must have the Business or Enterprise edition of Acrobat Sign. |
Add an Authorization Request link
Your app must include a link your customers use to initiate the OAuth request process. The OAuth process starts with the client directing the user’s browser to make a request to the /public/oauth/v2 endpoint, with the requisite query string parameters. You are simply invoking the Acrobat Sign APIs here. For example:
https://secure.echosign.com/public/oauth?
   redirect_uri=https://your-oAuthInteraction-Server/your-oAuth-Page.html&
   response_type=code&
   client_id=xxxxxxxxxx&
   state=xxxxxxxxx&
   scope=user_read:account+user_write:account+user_login:account+agreement_read:account+agreement_write:account+agreement_send:account+widget_read:account+widget_write:account+library_read:account+library_write:account+workflow_read:account+workflow_write:account
Parameter |
Value |
Required? |
Description |
|---|---|---|---|
Base URI |
The Acrobat Sign endpoint |
yes |
The Acrobat Sign endpoint. For partner apps this should NOT contain the “shard” of an account (i.e.: na1, na2, eu1, jp1, etc.) |
response_type |
code |
yes |
The value must always be code. Tells the process you’re looking for the OAuth code on the redirect URI once your customer logs in and accepts the auth permissions. |
client_id |
Your ID obtained from the OAuth configuration page. |
yes |
Identifies to Acrobat Sign what application your customer is requesting a token for (the one for your app/platform) |
redirect_uri |
Your custom, secure, and absolute URI; for e.g. https://your-oAuthInteraction-Server/your-oAuth-Page.html. |
yes |
Redirects users here at the end of the authorization process. The value must belong to the set of values specified on the OAuth Configuration page. |
scope |
A space delimited set of permissions specified during the OAuth configuration setup on the Configure OAuth page. In other words, these control your app’s capabilities with respect to the Acrobat Sign API. |
yes |
The permissions that the user will be asked to approve |
state |
Any string |
no |
This value returns to the client as a parameter at the end of the authorization process. While not required, use of the |
Success vs failure
When your customer initiates OAuth process by clicking your app’s Sign link, their browser redirects to the redirect_uri specified in the initial request. Query string parameters will be added to indicate whether the request succeed or failed.
Parameter |
Value |
|---|---|
code |
The authorization code which the client must use in the upcoming Access Token Request step. |
state |
The value of state initially passed in, if any. |
Parameter |
Value |
|---|---|
error |
One of:
|
state |
The value of state initially passed in, if any. |
The customer experience
Tip
Try out the live demo.
Customers are first routed to Acrobat Sign’s main log in page (if they are not already logged in).
After signing in, a confirmation screen appears:
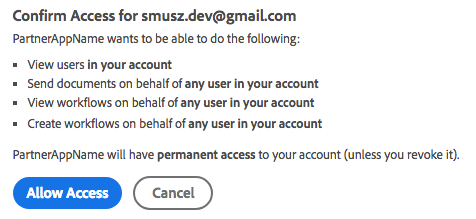
When the user selects Allow Access, the page redirects to the URL defined on your server (see above). The process adds query string parameters the app needs to retrieve the refresh and access tokens for making API calls.
https://your-oauthinteraction-server/your-oAuth-Page.html?
   code=CBNCKBAAHBCAABAApvoU1TLVOj_GuGynhtExjJbQNOmst9KP&
   api_access_point=https%3A%2F%2Fapi.na1.echosign.com%2F&
   state=uhuhygtf576534&
   web_access_point=https%3A%2F%2Fsecure.na1.echosign.com%2F
Name |
Description |
|---|---|
code |
In this example, CBNCKBAAHBCAABAApvoU1TLVOj_GuGynhtExjJbQNOmst9KP is the code your system uses to make the actual API call to get tokens. It is valid for only 5 minutes. |
api_access_point |
The encoded URL which is the base URL for the account where you will need to start your REST calls for uploading docs, creating templates, getting agreement “views”, sending agreements, etc. The |
state |
The string your system provided which identifies the instance of your application/platform making this request. |
web_access_point |
The URL where your customer logs in. |
Getting the Access Token
If the previous steps succeeded, request an access token by sending the authorization code along with the client ID and client secret to the Sign service. The client makes an HTTP POST to the /oauth/v2/token endpoint (using https://api.na1.adobesign.com) with the following parameters in the post body (not through query parameters):
POST /oauth/token HTTP/1.1
   Host: api.na1.adobesign.com
   Content-Type: application/x-www-form-urlencoded
   Cache-Control: no-cache

     grant_type=authorization_code&
     code=CBNCKBAThIsIsNoTaReAlcs_sL4K32wCzs4N&
     client_id=CBAThIsIsNoTaReAlmPBvPF&
     client_secret=319UThIsIsNoTaReAl2-4OxkVo9ycU&
     redirect_uri=https://myserver.com HTTP/1.1
The response returns the following JSON body containing the access token and the refresh token:
{
   "access_token":"3AAABLblThIsIsNoTaReAlToKeNPr6Cv8KcZ9p7E93k2Tf",
   "refresh_token":"3AAABLblThIsIsNoTaReAlToKeNWsLa2ZBVpD0uc*",
   "token_type":"Bearer",
   "expires_in":3600,
   "api_access_point ":"https://api.na1.adobesign.com/",
   "web_access_point":" https://secure.na1.adobesign.com/"
}
Name |
Value |
|---|---|
access_token |
Use this token to access any Acrobat Sign API endpoint. |
refresh_token |
If your access token expires, use the refresh token to request a new access token. Keep your client ID and secret handy to request a new access token from a refresh token. |
token_type |
Always “Bearer” |
expires_in |
The number of milliseconds in which the access token expires. |
api_access_point |
Use this endpoint for Sign API access; it the base URI to be used for subsequent calls (/oauth/v2/refresh and /oauth/v2/revoke) |
web_access_point |
Use this endpoint to open Sign Web, e.g. web_access_point + “/public/login” OR web_access_point + “/public/logout” . |
Using OAuth tokens
Authorization request
Access token request
Refresh token request
Now we can find this Customer’s instance using the state ID and store the tokens.
Since an access token expires in one hour (expires_in: 3600), use the refresh token is request new access tokens. You’ll call to the same access point (e.g. $api_access_point = https://api.na1.echosign.com), but you’ll POST to https://api.na1.echosign.com/oauth/refresh. Note the following:
The refresh token expires after 60 days of inactivity.
A client can continue to use a refresh token indefinitely as long as it is being used at least once every 60 days.
Every time you use the refresh token to get a new access token, reset the expiration on the refresh token to 60 days from the current time.
If you are concerned about slow or no activity causing the refresh token to expire, set up a job that refreshes the access token every 1-N days (e.g. 50)
POST /oauth/v2/refresh HTTP/1.1
Host: api.na1.adobesign.com
Content-Type: application/x-www-form-urlencoded

  refresh_token=2AAABLKmtbUAK7FeMV0hAiLf_W5x38LM67PXHapM&
  client_id=d4HQNPFIXFD255H&
  client_secret=1a98b7cb92407cbd8961cd8db778de53&
  grant_type=refresh_token
Parameter |
Value |
Required? |
Description |
|---|---|---|---|
grant_type |
refresh_token |
yes |
The value must always be |
client_id |
The ID obtained from the OAuth configuration page. |
yes |
Identifies the application. |
client_secret |
The ID obtained from the OAuth configuration page. |
yes |
Authenticates the application |
refresh_token |
The Refresh Token received during the previous step |
yes |
Revoking a token
Access as well as refresh tokens can be revoked. If an access token is revoked and it has a corresponding refresh token, the refresh token is also revoked. When a refresh token is revoked, all the access tokens issued from that refresh token are also revoked. Revoke tokens via a POST call to the /oauth/v2/revoke endpoint (using the api_access_point retrieved in the Access Token Request step), with the following parameter:
Parameter |
Value |
Required? |
|---|---|---|
token |
OAuth access or refresh token |
yes |
POST /oauth/v2/revoke HTTP/1.1
  Host: api.na1.adobesign.com
  Content-Type: application/x-www-form-urlencoded

  token=2AAABLKmtbUAK7FeMV0hAiLf_W5x38LM67PXHapM*&
If request succeeds, an HTTP success code 200 returns without any body. If the request fails, the following error codes are returned in JSON format:
Http status code |
Error code |
Description |
|---|---|---|
400 |
INVALID_REQUEST |
Empty or missing token |
400 |
EXPIRED_TOKEN |
Token is expired or already revoked |
400 |
INVALID_TOKEN |
This is not a valid OAuth access or refresh token |